
目次
木のフラクタル図形
木の作成方法
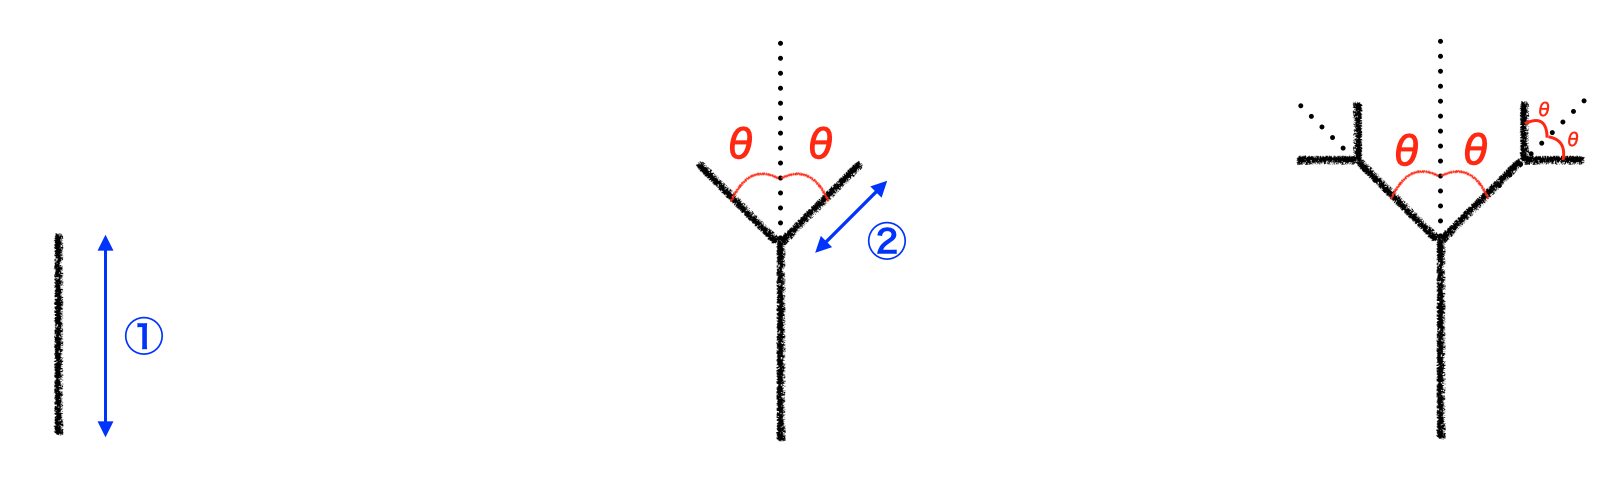
以前、「フラクタル 再帰とカントール集合」という記事で、再帰関数とフラクタル図形の一例としてカントール集合について紹介しました。今回は再帰処理で「木のフラクタル図形」を作成してみます。図形の作成の手順を次に示します。
- 直線を描く
- 直線の先端で、反時計回りに回転して短いを直線を描き、時計回りにも回転して短い直線を描く
- 新しい直線に対して手順2を繰り返し、以降も処理を繰り返していく
この手順を図示すると、下図のようになります。
木の作成プログラム
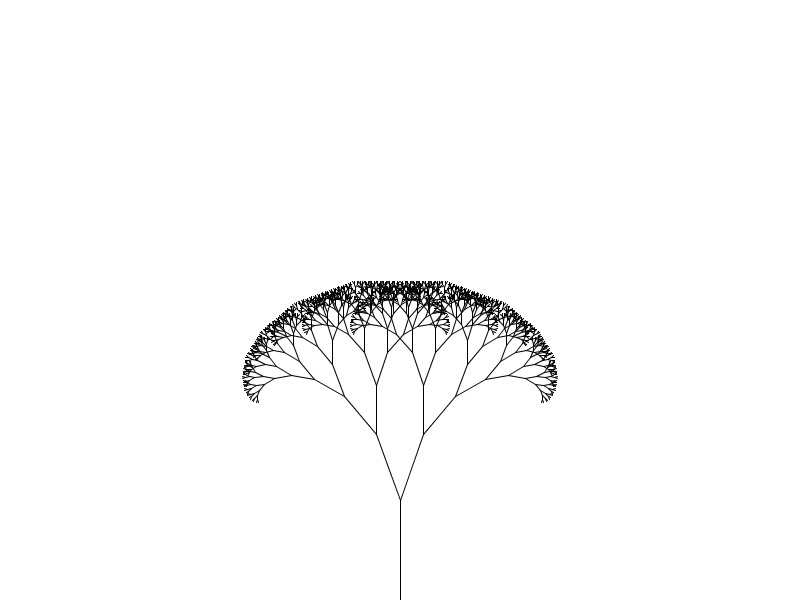
Processingで「木のフラクタル図形」を表示するコードを示します。コード36行目の「branch」という関数を再帰的に呼び出すことで、木を作成しています。コードでは、グローバル変数として5つのパラメータを定義しています。値の設定はsetup関数内で行なっています。パラメータの一覧を下表に示します。
| パラメータ名 | 値 | 意味 |
|---|---|---|
| tree_step | 10 | 手順②以降の処理を再帰的に繰り返す回数 |
| tree_angle | 20 | 手順②の回転角度θ |
| tree_length | 100 | 手順①で描く直線の長さ |
| tree_startx | width/2 | 手順①で描く直線のx位置 |
| tree_scale | 0.7 | 手順②の直線と手順①の直線の長さの比 |
keyPressed関数には、スペースキーが押された時の処理を記述しています。ここでは、スペースキーを押すと”tree.jpg”という名前で画像を保存するようになっています。
コードを実行すると、実行結果のような左右対称なフラクタル図形が表示されます。これは決定的フラクタルで、ランダム性がないので、何度実行しても同じ結果になります。
コード
1 2 3 4 5 6 7 8 9 10 11 12 13 14 15 16 17 18 19 20 21 22 23 24 25 26 27 28 29 30 31 32 33 34 35 36 37 38 39 40 41 42 43 44 45 46 47 48 49 50 51 52 53 54 55 | int tree_step; float tree_angle; float tree_length; float tree_startx; float tree_scale; void setup() { size(800, 600); tree_step = 10; tree_angle = 20; tree_length = 100; tree_scale = 0.7; tree_startx = width/2; tree_angle = radians(tree_angle); newTree(); } void draw() { background(255); newTree(); noLoop(); } void keyPressed() { if ( key == ' ' ) { save("tree.jpg"); } } void newTree() { translate(tree_startx, height); branch(tree_startx, tree_length, tree_step); } void branch(float x0, float h, int n) { float theta; line(0, 0, 0, -h); translate(0, -h); h *= tree_scale; if (n > 0) { theta = -tree_angle; pushMatrix(); rotate(theta); branch(x0, h, n-1); popMatrix(); theta = tree_angle; pushMatrix(); rotate(theta); branch(x0, h, n-1); popMatrix(); } } |
実行結果
パラメータを変えて遊んでみる
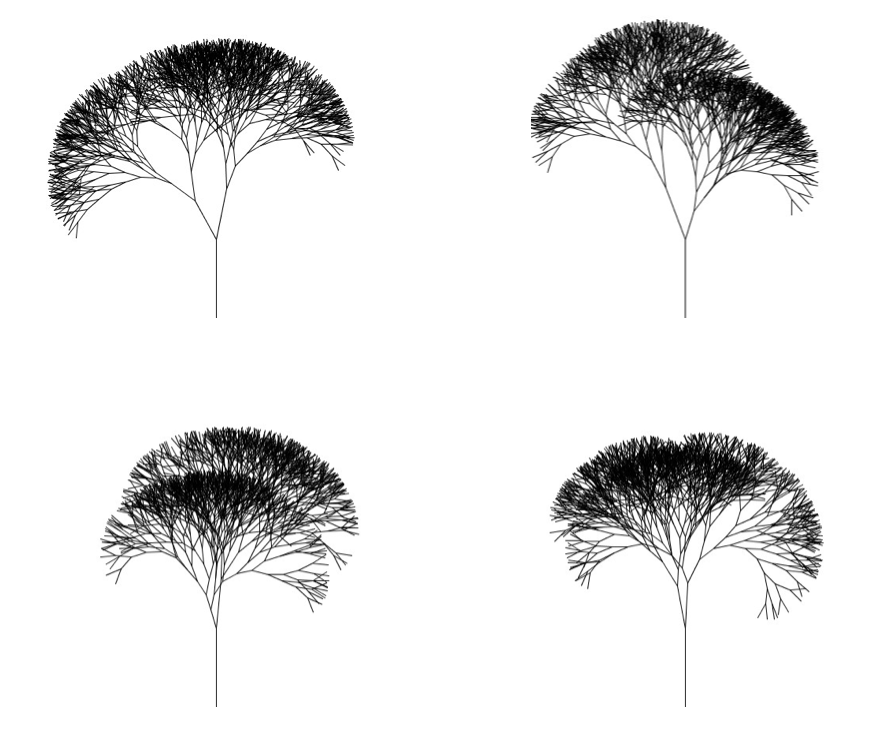
tree_angleを10°、60°、90°、120°に変更して、木の形がどうのように変わるか見てみます。コードの10行目を変更すると、下図に示すような結果が得られます。
実行結果

ひとつのパラメータを変更しただけでも、色々な図形を生成することができます。後半ふたつについては、「これは木です!」とは言えないと思いますが……。冷静に考えていけば、何故このような結果になったか、分かると思います。
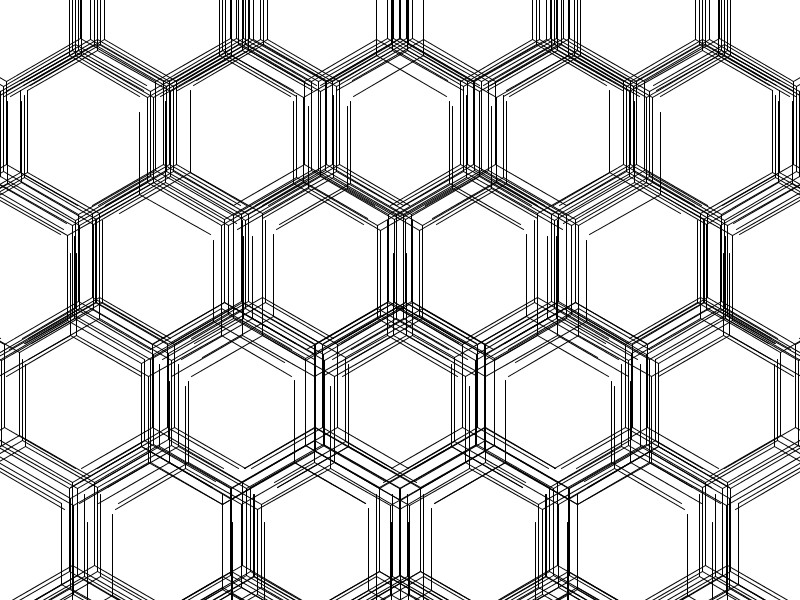
tree_angle=60、tree_scale=0.98とすると、次の六角形を敷き詰めたような画像を生成することもできます。
他にも面白みのある図形を生成できるかもしれませんね。皆さんも色々なパラメータを試してみだくさい!
決定的フラクタルから確率的フラクタルへ
木にランダム性を持たせる
ここまで見てきたのは決定的フラクタルです。ここからは木を作成するコードにランダムな要素を追加していきます。乱数については、「Processingで乱数生成!」の記事で紹介しています。
分岐する枝の長さと角度がランダムになるように、「tree_1」のコードをベースに、下記のコードを作成しました。ランダム性を持たせるために、branch関数内で、Processingのrandom関数を使いました。このコードでは、枝の長さが短くなりすぎないように、長さに下限値を設定しています。具体的には、「tree_length_limit」というグローバル変数を追加して、setup関数内で値を指定しています。mousePressed関数では、マウスボタンが押された時の処理を指定します。下記のコードではマウスのボタンを押すたびに、draw関数が再実行されて、木の形が変わっていきます。いくつか実行結果を示します。
コード
1 2 3 4 5 6 7 8 9 10 11 12 13 14 15 16 17 18 19 20 21 22 23 24 25 26 27 28 29 30 31 32 33 34 35 36 37 38 39 40 41 42 43 44 45 46 47 48 49 50 51 52 53 54 55 56 57 58 59 60 | int tree_step; float tree_angle; float tree_length; float tree_length_limit; float tree_startx; float tree_scale; void setup() { size(800, 600); tree_step = 10; tree_angle = 30; tree_length = 100; tree_length_limit = 20; tree_scale = 0.7; tree_startx = width/2; tree_angle = radians(tree_angle); newTree(); } void draw() { background(255); newTree(); noLoop(); } void keyPressed() { if ( key == ' ' ) { save("tree.jpg"); } } void mousePressed() { redraw(); } void newTree() { translate(tree_startx, height); branch(tree_startx, tree_length, tree_step); } void branch(float x0, float h, int n) { float theta; line(0, 0, 0, -h); translate(0, -h); h *= tree_scale; if (n > 0) { theta = random(0, tree_angle); pushMatrix(); rotate(theta); branch(x0, random(tree_length_limit,h), n-1); popMatrix(); theta = random(-tree_angle,0); pushMatrix(); rotate(theta); branch(x0, random(tree_length_limit,h), n-1); popMatrix(); } } |
実行結果
何となく自然なイメージに近づいたでしょうか。またパラメータを色々と変えてみれば、新しい発見があるかもしれません。
枝の太さと色に変化をつけてみる
木の枝が分岐するたびに細くなっていくように、「tree_2」のコードを書きかえました。48行目で線の太さを指定しています。新しいグローバル変数「tree_sw_scale」を追加していますが、これは枝の太さを調整するための係数です。値はsetup関数内で指定しています。さらに50行目のif文で木の先端の枝を緑になるようにしました。その他のグローバル変数のパラメータ設定値についても一部変更しています。「tree_sw_scale」を変えた4パターンの実行結果を示します。
コード
1 2 3 4 5 6 7 8 9 10 11 12 13 14 15 16 17 18 19 20 21 22 23 24 25 26 27 28 29 30 31 32 33 34 35 36 37 38 39 40 41 42 43 44 45 46 47 48 49 50 51 52 53 54 55 56 57 58 59 60 61 62 63 64 65 66 67 | int tree_step; float tree_angle; float tree_length; float tree_length_limit; float tree_startx; float tree_scale; float tree_sw_scale; void setup() { size(800, 600); tree_step = 15; tree_angle = 25; tree_length = 100; tree_length_limit = 20; tree_scale = 0.7; tree_sw_scale = 0.75; tree_startx = width/2; tree_angle = radians(tree_angle); newTree(); } void draw() { background(255); newTree(); noLoop(); } void keyPressed() { if ( key == ' ' ) { save("tree.jpg"); } } void mousePressed() { redraw(); } void newTree() { translate(tree_startx, height); branch(tree_startx, tree_length, tree_step); } void branch(float x0, float h, int n) { float theta; strokeWeight (int ((n+1)*tree_sw_scale)); stroke(0); if (n < 1) stroke (171,255,127); line(0, 0, 0, -h); translate(0, -h); h *= tree_scale; if (n > 0) { theta = random(0, tree_angle); pushMatrix(); rotate(theta); branch(x0, random(tree_length_limit,h), n-1); popMatrix(); theta = random(-tree_angle,0); pushMatrix(); rotate(theta); branch(x0, random(tree_length_limit,h), n-1); popMatrix(); } } |
実行結果
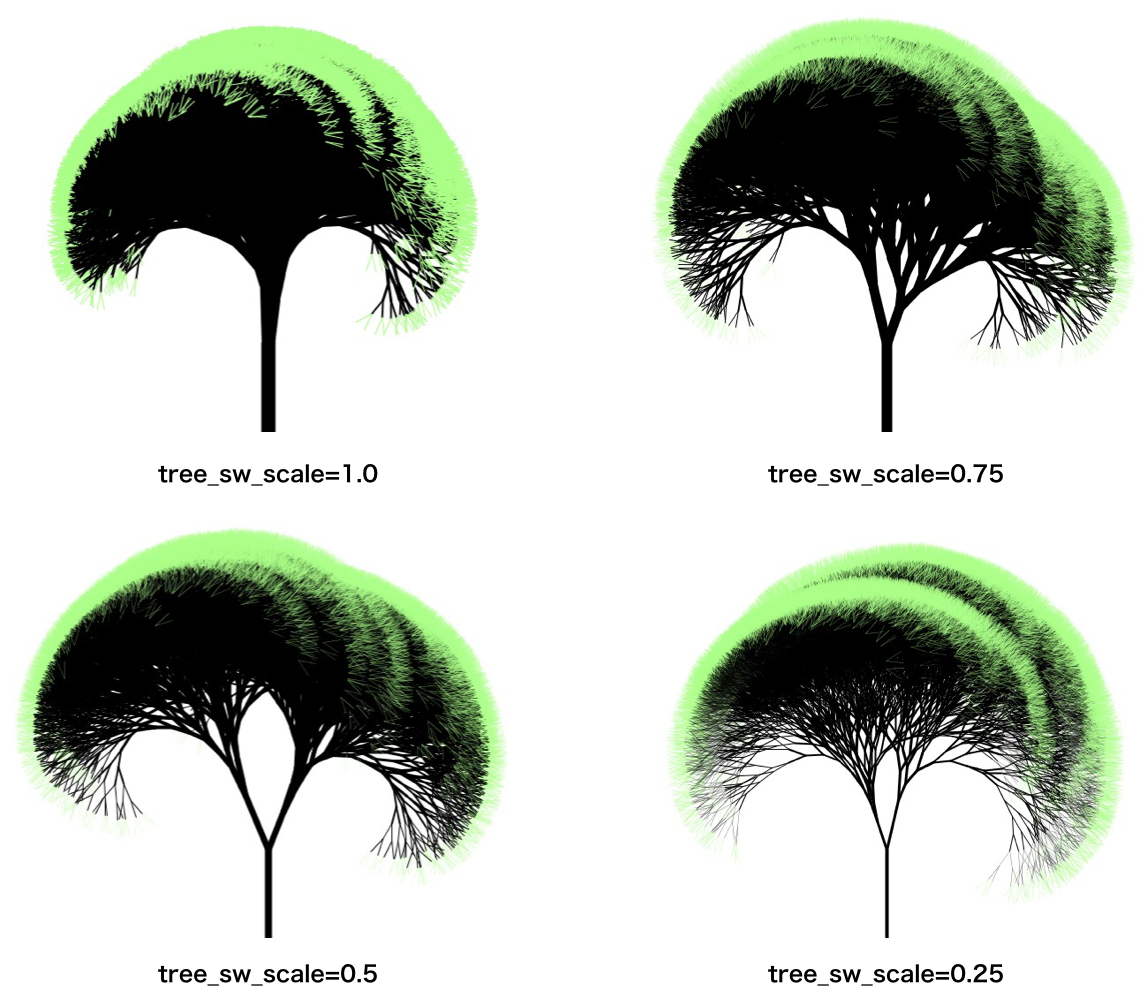
実行結果を見ると、枝の太さだけでなく木の形も変わっています。これは枝の長さと角度をランダムにしているためです。最初に作成した「木のフラクタル図形」と比較してみてください。かなり自然のイメージに近づいたと思います。
まとめ
今回は「木のフラクタル図形」を例として、決定的フラクタルと確率的フラクタルについて紹介しました!今回作成したコードのパラメータを変更して、いろいろ遊んでみてください!!


美しくて見入ってしまいました…!
わかりやすく解説されており大変参考になりました。
記事を書いてくださりありがとうございます!!